Hacer un menú desplegable en blogger es muy sencillo.
Una vez pegado el texto tienes que modificarlo para configurar tu menú en la forma que tu quieras, para ello hay 3 elementos que tienes que tener en cuenta:
Una vez definida la estructura del menú el siguiente paso es darle forma y personalizarlo, para ello tienes que ir al editor de blogger y hacer click en Plantilla/Personalizar/Avanzado/Añadir CSS y copiar y pegar el siguiente código:
/* Menu desplegable
—————- */
.tabs-inner .section:first-child ul { margin-top: 0px;}
.tabs-inner .widget ul { background: #ffffff; text-align: left !important;}/*Posición del texto del menu*/
.tabs-inner .widget li.selected a, .tabs-inner .widget li a:hover {
color: #eeeeee; /*Color del texto de las pestañas al pasar el ratón por encima*/
background-color: #ffffff; /*Color del fondo de las pestañas al pasar el ratón por encima*/
text-decoration: none;
}
.tabs .widget li, .tabs .widget li{ display: inline; float: none;}
#NavMenu {
position: relative;
margin: 0 auto;
padding: 0;
border: 1px solid #333333; /*Borde del menú*/
background: #333333; /*Color de fondo del menú*/
}
#NavMenuleft {
width: 923px; /*Ancho del menú*/
float: none;
margin: 0 auto;
padding: 0;
}
#nav {margin: 0 auto; padding: 0; background:#fff;}/*Color del fondo del menu*/
#nav ul {
float: none;
list-style: none;
margin: 0;
padding: 0;
overflow: visible;
}
#nav li a, #nav li a:link, #nav li a:visited {
font: normal 16px Arial; /*Tamaño y tipo de fuente de las pestañas */
color: #666666; /*Color del texto de las pestañas*/
display: block;
margin: 0;
padding: 10px 15px 10px;
}
#nav li a:hover, #nav li a:active {
color: #cccccc; /*Color del texto de las pestañas al pasar el ratón por encima*/
margin: 0;
padding: 10px 15px 10px;
text-decoration: none;
}
#nav li li a, #nav li li a:link, #nav li li a:visited {
font: normal 16px Arial; /*Tamaño y tipo de fuente de los submenus*/
background: #eeeeee; /*Color del fondo de las subpestañas*/
width: 150px; /*Ancho de los submenus*/
color: #333333; /*Color del texto de los submenus*/
float: none;
margin: 0;
padding: 7px 10px;
}
#nav li li a:hover, #nav li li a:active {
background: #ffffff; /*Color del fondo de los submenus al pasar el ratón por encima*/
color: #222222; /*Color del texto de los submenus al pasar el ratón por encima*/
padding: 7px 10px;
}
#nav li {
float: none;
display: inline-block;
list-style: none;
margin: 0;
padding: 0;
}
#nav li ul { z-index: 9999; position: absolute; left: -999em; height: auto; width: 170px; margin: 0; padding: 0; }
#nav li ul a { width: 140px; }
#nav li ul ul { margin: -32px 0 0 171px; }
#nav li:hover ul ul, #nav li:hover ul ul ul, #nav li.sfhover ul ul, #nav li.sfhover ul ul ul {left: -999em; }
#nav li:hover ul, #nav li li:hover ul, #nav li li li:hover ul, #nav li.sfhover ul, #nav li li.sfhover ul, #nav li li li.sfhover ul { left: auto; }
#nav li:hover, #nav li.sfhover {position: static;}
.tabs-outer{overflow: visible;}
.tabs-inner { padding: 0px; } .section { margin: 0px; }
How to make a drop down menu on blogger in 5 steps
Tutorial to make a drop down menu on blogger easiest way.
A drop-down menu can be a great option when we started having a lot of content in our blog and we want to organize them in the most efficient grouping by categories and subcategories.
Make a drop down menu in blogger is very simple.
Always remember that before you start making changes is recommended that you back up your blog.
Step 1.
Copy the following code:
<Div id = 'navmenu'>
<Div id = 'NavMenuleft'>
<Ul id = "nav">
normal <li> <a href='#'> Menu </a> </ li>
<Li>
<a href='#'> Menu drop down 1 </a>
<Ul>
<Li> <a href='#'> submenu 1 </a> </ li>
<Li> <a href='#'> submenu 2 </a> </ li>
<Li> <a href='#'> submenu 3 </a> </ li>
</ Ul>
</ Li>
<Li>
<a href='#'> Menu drop down 2 </a>
<Ul>
<Li> <a href='#'> submenu 1 </a> </ li>
<Li> <a href='#'> submenu 2 </a> </ li>
<Li> <a href='#'> submenu 3 </a> </ li>
<Li> <a href='#'> submenu 4 </a> </ li>
</ Ul>
</ Li> </ ul>
</ Div>
</ Div>
Step 2
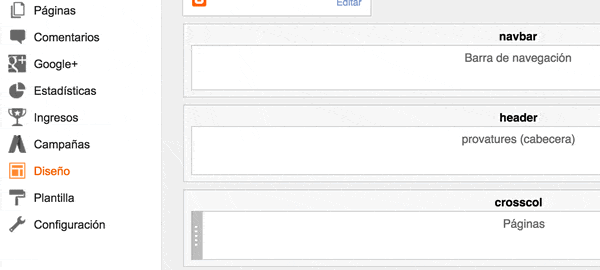
Open blogger editor and go to the Layout option.
If you already have a menu (crosscol, pages) you can remove or change of location (if you do not like it is new and want to return the old), to change of place position yourself on the dots there on the right side ( white dots in a vertical, gray background) and when your pointer out a cross you can click and move to put it on the side while you make changes, if you like the end result and can remove this menu. Important when you make changes in design, if you move above elements, remember
Making dropdown menu on blogger
Step 3.
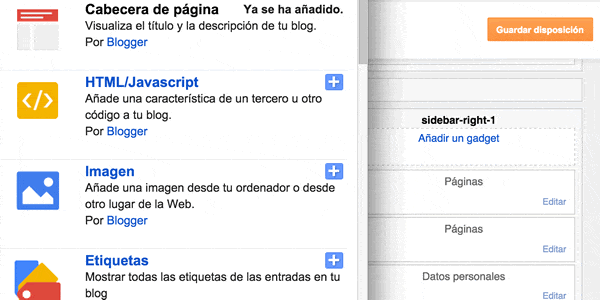
Click right on Add a gadget and menu options you out choose the opciónHTML / Javascript, a small window paste the code you copied earlier in the space where it says content, the title can leave blank or open set menu as you want
Make drop-down menu on blogger
Step 4.
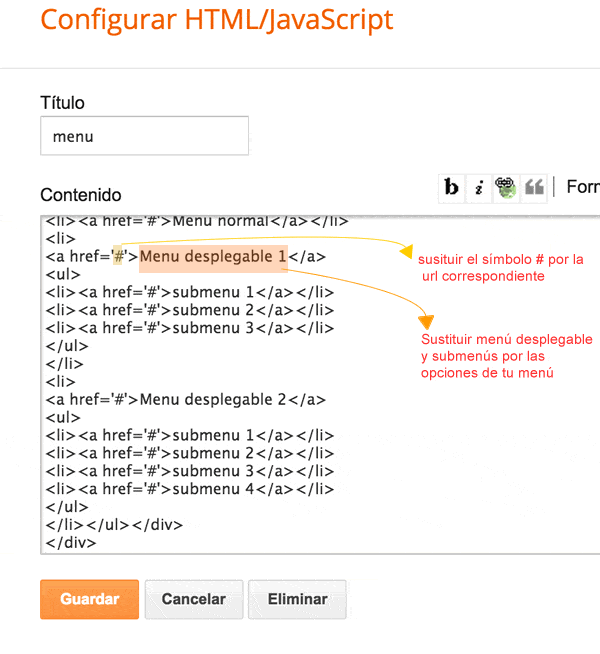
Once pasted the text you have to modify it to configure your menu the way you want, for that there are 3 elements that you have to consider:
The menu structure:
single button (without submenus): the single button corresponds with this piece of code: <li> <a href='#'> Menu Normal </a> </ li>
Button with submenu: the submenu button corresponds with this piece of code:
<Li>
<a href='#'> Menu drop down 1 </a>
<Ul>
<Li> <a href='#'> submenu 1 </a> </ li>
<Li> <a href='#'> submenu 2 </a> </ li>
<Li> <a href='#'> submenu 3 </a> </ li>
</ Ul>
</ Li>
Menu items:
<a href='#'>: you have to change the symbol # in the url or web address you want me the link (note the quotes do not inadvertently delete the url must go between quotes, just replace the #, eg if I have <a href='#'> and I want to go to trucos-diseno-web.euroresidentes.com would have to put: <a href = 'http: //www.trucos- diseno-web.euroresidentes.com '>
Which he puts menus and submenus replace words by categories or sections of your blog.
Once made the changes remember to save them.
drop-down menu on blogger
Step 5.
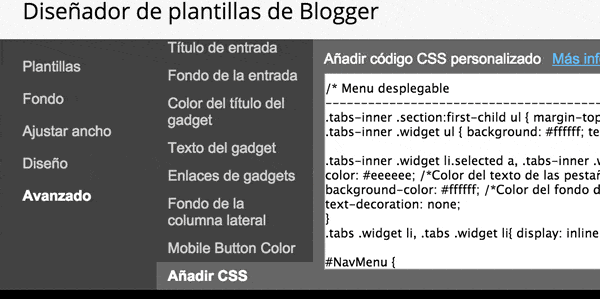
Once the menu structure defined the next step is to shape and customize it, for it you must go to blogger and editor click Template / Customize / Advanced / Add CSS and copy and paste the following code:
/* Dropdown menu
------ * /
.tabs-inner .section: first-child ul {margin-top: 0px;}
.tabs .widget ul-inner {background: #ffffff; text-align: left important;} / * Position menu text * /
.tabs-inner .widget li.selected to, .tabs-inner .widget li a: hover {
Color: #eeeeee; / * Text color tabs hovering above * /
background-color: #ffffff; / * Background color tabs hovering above * /
text-decoration: none;
}
.tabs .widget li, .tabs .widget li {display: inline; float: none;}
#NavMenu {
position: relative;
margin: 0 auto;
padding: 0;
border: 1px solid # 333333; / * Edge menu * /
background: # 333333; / * Background color menu * /
}
#NavMenuleft {
width: 923px; / * Width menu * /
float: none;
margin: 0 auto;
padding: 0;
}
#nav {margin: 0 auto; padding: 0; background: #fff;} / * Background Color menu * /
#nav ul {
float: none;
list-style: none;
margin: 0;
padding: 0;
overflow: visible;
}
#nav li a, #nav li a: link, #nav li a: visited {
font: 16px Arial Normal; / * Size and font of the tabs * /
color: # 666666; / * Text color tabs * /
display: block;
margin: 0;
padding: 10px 15px 10px;
}
#nav li a: hover, #nav li a: active {
Color: #cccccc; / * Text color tabs hovering above * /
margin: 0;
padding: 10px 15px 10px;
text-decoration: none;
}
#nav li li a, #nav li li a: link, #nav li li a: visited {
font: 16px Arial Normal; / * Size and font of submenus * /
background: #eeeeee; / * Background color of the sub-tabs * /
width: 150px; / * Width of submenus * /
color: # 333333; / * Text color submenus * /
float: none;
margin: 0;
padding: 10px 7px;
}
#nav li li a: hover, #nav li li a: active {
background: #ffffff; / * Background color submenus hovering above * /
color: # 222222; / * Text color submenus hovering above * /
padding: 10px 7px;
}
#nav li {
float: none;
display: inline-block;
list-style: none;
margin: 0;
padding: 0;
}
#nav ul li {z-index: 9999; position: absolute; left: -999em; height: auto; width: 170px; margin: 0; padding: 0; }
#nav ul li a {width: 140px; }
#nav ul ul li {margin: -32px 0 0 171px; }
#nav li: hover ul ul, #nav li: hover ul ul ul, #nav li.sfhover ul ul, ul ul ul #nav li.sfhover {left: -999em; }
#nav li: hover ul, li #nav li: hover ul, #nav li li li: hover ul, ul #nav li.sfhover, #nav li.sfhover ul li, li li #nav li.sfhover ul {left: car; }
#nav li: hover, #nav li.sfhover {position: static;}
.tabs-outer {overflow: visible;}
.tabs-inner {padding: 0px; .section} {Margin: 0px; }
Make drop-down menu on blogger
Once pasted the code you can make changes to customize and tailor the look of your blog, the red text tells you that part owns that piece of code and blue I have set the values you can change the color of text, funds, font ... Remember after making changes save changes forever. You can see the sample menu on the blog test